思路
gitea server内容管理工具。 ✅
hugo作为web发布工具。 ✅
shell脚本,一键发布。 ✅
整体过程:本地变更 - git push - 登录remote - pull - hugo发布 - 检查服务(nginx/gitea/mount)
git管理和hugo网站管理完全融合。内容修改后,执行shell,git变更和hugo发布都完成。 ✅
自动化部署
webhook,参考: testhook
该方法废弃 ❌
‼️ 依赖git配置,稳定性不好。改为ssh远端直接git pull内容,简单可靠。
运行
[gavin@kvm-douboer ~/myweb]$ pwd /home/gavin/myweb 在服务器侧该目录下运行: [gavin@kvm-douboer ~]$ sudo hugo server -D --bind 24.233.3.126 -p 80 --baseURL=http://biboer.cn &
改为本地运行: ✅
gavin myweb % cat ~/rungit.bat
cd ~/myweb

git add .
git commit -m "gavin's website"
git push origin main

ssh -p 21174 gavin@biboer.cn 'cd ~/myweb && ./remotepull.sh && ./hugorun.sh && ./check_services.sh'
过程记录
20240222
废弃 ❌
有问题,git是密文方式存储,nginx不能直接解析;
变通的办法是,用一个定时任务发布到nginx指向的目录。
client: A1(从gitserver拉下来,日常编辑维护)
⬆️
server: git server --> A2(从gitserver定时拉取,不会手动变更) <-- nginx
web发布选型
hexo
wordpress
hugo ✅
markdown
网络&服务器&部署
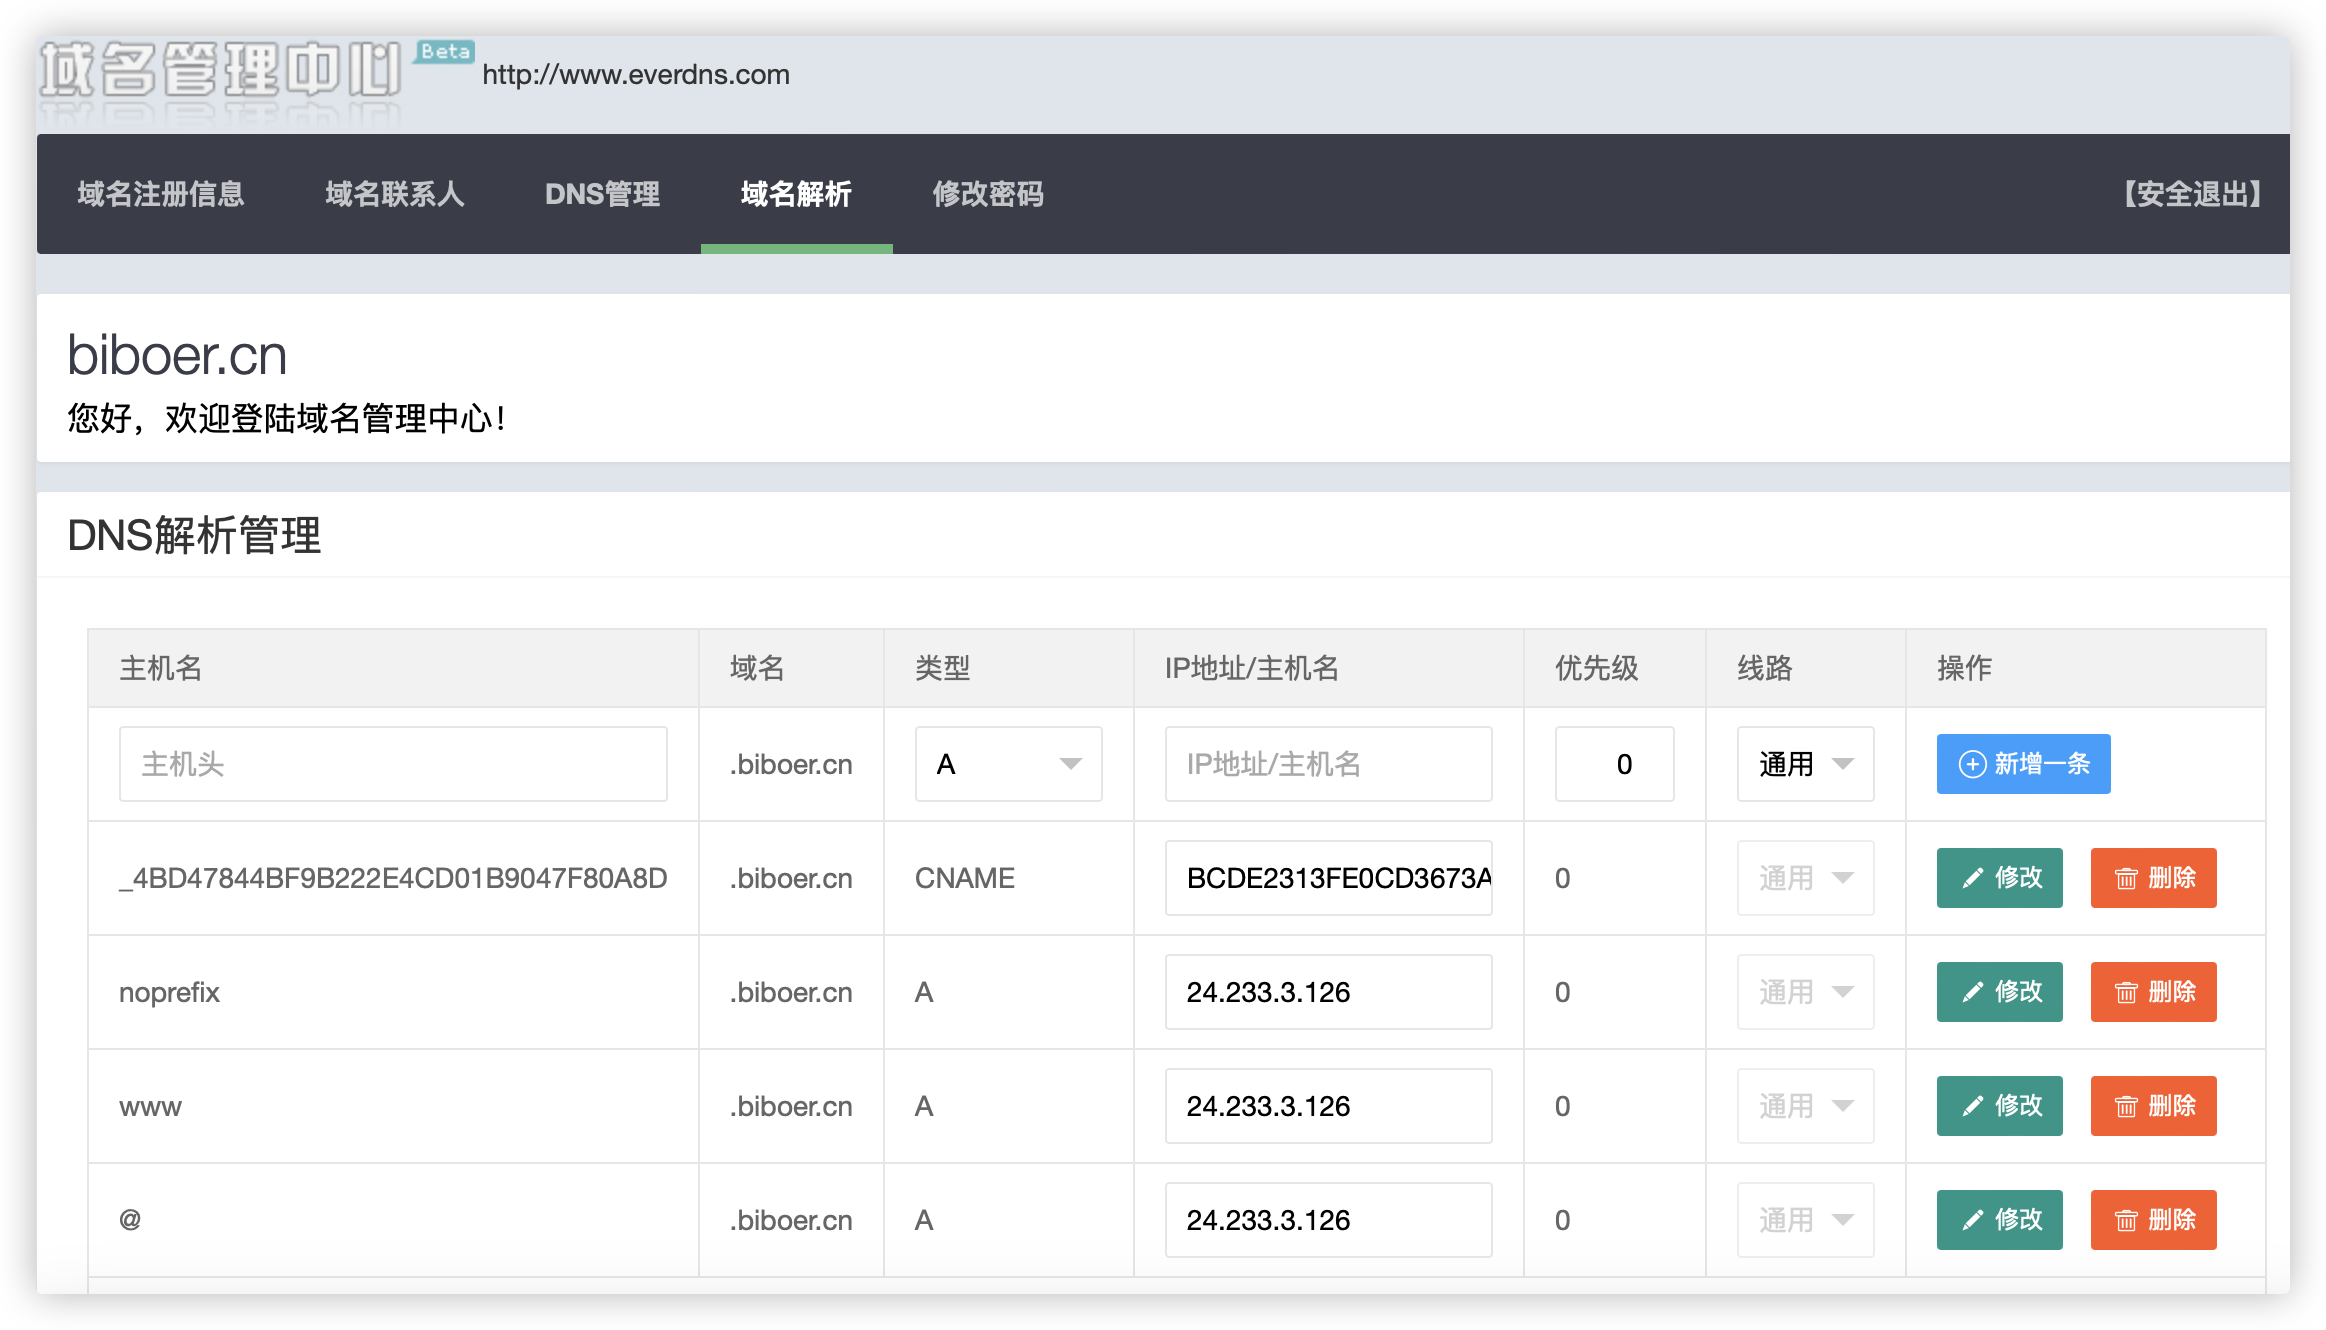
biboer.cn,www.biboer.cn,解析到24.233.3.126通 配置页面,http://www.everdns.com/Analysis
Centos7.3、nginx环境下部署hugo博客 https://cloud.tencent.com/developer/article/1834210
yum install net-tools -y netstat -lnpt
- hugo example无法访问。 hugo server -D --themesDir ../..
solve ✅
cd /home/gavin/notrack/exampleSite hugo server -D --themesDir ../.. --bind 24.233.3.126 -p 80 --baseURL=http://24.233.3.126:80
--themesDir themes目录所在的路径(相对于当前执行路径)
20240223
https://gohugo.io/getting-started/quick-start/
git submodule add https://github.com/theNewDynamic/gohugo-theme-ananke.git themes/anankevs. ❓
git remote add origin https://github.com/theNewDynamic/gohugo-theme-ananke.git
git pull
20240224
find | grep config. | xargs -I {} cp {} /tmphugo server --bind 24.233.3.126 -p 80 --baseURL=http://24.233.3.126:80
- scp推送到远程 scp ~/Downloads/IMG_0688.heic gavin@biboer.cn :/tmp
目前:主要用git,偶尔Firezilla
20240225
部署hugo-theme-cleanwhite。 ✅
研究config.toml,algolia搜索。已解决。 ✅
🔔 markdown不换行问题,末尾加两空格。
🔔 统一用空行。
20240225
- gavin@GavinsMAC webhook% git push -u origin master error: src refspec master does not match any error: failed to push some refs to 'https://gitee.com/douboer/testhook.git'
Solve ✅
git branch -l
git checkout master
20240226
markdown头部解析及方便维护问题。通过webhook,自动部署服务
本地修改 -- 提交到github/gitee -- 触发webhook -- push到web服务器
废弃 ❌
nodejs环境 ~~问AI,在服务器侧写一段js代码,监听80端口用户访问http://www.biboer.cn/xxx/,当用户访问该链接触发服务器侧调用shell脚本“pushshell”,并打印log ~~ 用python代码解决。
./themes/hugo-theme-cleanwhite/layouts/404.html # 定义404页 ✅
20240228
- 从notebook采编代码,未完成❓
- 解析markdown文件,按目录头(##)分割文件,输出到不同的文件中。
- 文件名使用:目录标题.md
- 生成的文件插入头部
- 解析markdown文件,按目录头(##)分割文件,输出到不同的文件中。
格式:parsedairy.py -t -l 2 *.md -t 时间解析,放到文件头的date中,如: "date: 2024-01-00 18:00:00" -l num,解析到哪一级,如##,num为2
algolia 搜索,未成功❓ ✅
hugo命令生成静态页面public作用,发布流程❓ ✅ A:自己部署nginx等web service,发布到相应目录部署。 用hugo自带的服务器能力,不需要用hugo命令生成public
20240310
- 增加baidu统计 ❌ ( --- goaccess ) https://tongji.baidu.com/main/setting/10000614168/home/site/index
<script>
var _hmt = _hmt ⎪⎪ [];
(function() {
  var hm = document.createElement("script");
  hm.src = "https://hm.baidu.com/hm.js?8af1866964126ae65f4b6d38d2030b73";
  var s = document.getElementsByTagName("script")[0];
  s.parentNode.insertBefore(hm, s);
})();
</script>
tracking ID: 8af1866964126ae65f4b6d38d2030b73 写到config.toml的ba_track_id中,即可。
模版中已经吧以上scipt写到themes/hugo-theme-cleanwhite/layouts/partials/footer.html中。 因此,所有页面加载时,都会附加以上脚本。
- 图床实际上没有必要使用,用filezilla更为方便。
本地目录直接上传目标/home/gavin/myweb/static/img即可。 ❌
文章中直接引用,相当高效。 ❌
文章的管理也一样,filezilla扔到/home/gavin/myweb/content/post下即可。 ❌
如需修改webserver中myweb下的其他文件,在本地修改完,git push上去即可。 gitee上的webhook会触发推送到webserver上。great!!! ✅
增加http://v6.51.la统计 ❌❌❌ ( 流氓软件 )
18042004300/Ga^^^^23
<script charset="UTF-8" id="LA_COLLECT" src="//sdk.51.la/js-sdk-pro.min.js"></script>
<script>LA.init({id:"3LTQf5zyPQGoGAJu",ck:"3LTQf5zyPQGoGAJu"})</script>
写入:themes/hugo-theme-cleanwhite/layouts/partials/footer.html
20240311
制作icon
sips -z 128 128 IMG_1350.png --out favicon.png
icotool -c favicon.png -o favicon.ico
20240408
其实不用hook那么复杂
在本地(rungit.sh):
git add .
git commit -m "gavin's website"
git push origin master
#增加以下远程执行就串起来了
ssh -p 21174 gavin@biboer.cn 'cd myweb && git pull origin master'
租用服务器出问题,系统通过控制台重装后,web恢复过程
初始化,root进入
创建gavin,用户组wheel(可以sudo)
sudo useradd -m -G wheel gavin设置或更改用户的密码
sudo passwd gavin

Sudo cd /etc/yum.repos.d
Sudo wget https://copr.fedorainfracloud.org/coprs/daftaupe/hugo/repo/epel-7/daftaupe-hugo-epel-7.repo -O hugo.repo
Sudo yum update
Sudo yum install hugo
hugo version

Sudo yum install git
git clone https://gitee.com/douboer/mewed.git

sudo yum install npm
Sudo npm -g install atomic-algolia
npm init
20240411 ‼️
MAC上,把notebook并入到myweb中来维护,不单独维护github上的notebook。 这样知识管理和web网站的维护一体化。不用搬来搬去了。
20240420 ‼️
git仓库、发布目录和本地obsidian笔记本三者保持一致,这样本地vi编辑md文件后,一键git push到远程仓库。
- 触发远程pull,hugo完成发布
- 本地可以使用obsidian浏览和编辑
发布环节很好,但obsidian看有个问题,就是图片链接问题。
图片在hugo中用格式。
图片在obsidian中用以下格式之一:
- `!【【picname.jpg】】
这让如果在web上正常显示,obsidian中就无法显示,怎么解❓
修改代码,兼容obsidian。花了半天时间,搞定: ✅
文章在themes/hugo-theme-cleanwhite/layouts/_default/single.html中渲染,思路就是改这个文件。 把所有!【【name】】转成<img src="/img/name" alt="name">,这样obsidian可以无缝对接。
    {{ $pattern := `!【【(.*?)】】` }}
    {{ $replace := `<img src="/img/$1" alt="$1">` }}
    {{ $content := .Content | replaceRE $pattern $replace }}
    {{ $content | safeHTML }}
    <!-- {{ .Content }} -->
‼️‼️ 注意:
- 必须用{{ $content | safeHTML }},用{{ $content }}渲染有问题。
- {{ $replace := `` }} 替换{{ $replace := `<img src="/img/$1" alt="$1">` }}不生效,不知原因❓原来使用的的! imgname 在vim中替换:
:%s/)/!【【\1]]/g❓ 进一步:obsidian中支持拷贝到特定文件夹。
使用图片管理插件。 ✅
markdown中html如要以文本形式显示,用\转义或content。
20240420
🚩 todo:
- 同样方式,在single中可以增加相册的解析,解决目前gallary排版在手机终端和pc终端不同的表现(两张一排或三张一排导致其中一类终端必定不整齐。)
 @media only screen and (min-width : 365px) {
     /* Tablet view: 3 tiles */
     .gallery .box {
         width: 33.3%;
         padding-bottom: 33.3%;
     }
 }
themes/hugo-theme-cleanwhite/static/css/hugo-easy-gallery.css
50%改为33.3%,解决! ✅
- 代码块长行无法折行问题? ✅
config.toml中配置:
wrap = true
无效。
修改themes/hugo-theme-cleanwhite/static/css/hugo-theme-cleanwhite.css
pre code{
  display:block;
  width:auto;
  white-space:pre-wrap; 原来为:pre
  word-wrap:normal
}
原来为:white-space:pre;
20240428
通过钩子方式实现把markdown中所有![ [name]]转成<img src="/img/name" alt="name"\>。
发现,
./themes/hugo-theme-cleanwhite/layouts/_default/_markup/render-image.html只对图片链接起作用。
./themes/hugo-theme-cleanwhite/layouts/_default/_markup/render-link.html只对
链接起作用。
怎么解决❓有没有针对content内容的钩子?
似乎没有。
是不是可以在markdwon渲染时做定制❓
渲染成html前替换。
./themes/hugo-theme-cleanwhite/layouts/_default/single.html
✅
20240420
扩展了段落前加||,替代<p style="font-family:'Microsoft YaHei',sans-serif;background-color:#BCC6CC ;padding:20px;border-radius:20px;line-height:35px;">段落内容</p>
用于题记等。
./themes/hugo-theme-cleanwhite/layouts/_default/single.html:
         {{ $patterns := dict `![ [(.*?)]]` `<img src="/img/$1" alt="$1">` `\|\|(.*)` `<p style="font-family:'Microsoft YaHei',sans-serif;background-color:#E5E4E2 ;padding:20px;border-radius:20px;line-height:35px;">$1</p>` }}
         {{ range $old, $new := $patterns }}
             {{ $content = replaceRE $old $new $content }}
         {{ end }}
✅
20240517
- hugo与微信公众号结合,发布markdown文章,同时发布一份到公众号中❓
- 通过接口方式发布或修改一篇文章,如果公众号中相同标题的文章已经存在就更新内容,如果不存在就发布为新文章。
- 文章的标题取更新的markdown内容中的title作为公众号的标题,markdown的文件名为链接中的filename,把"http://biboer.cn/post/filename/"内容采集到公众号。
- 采集后美化文章再发布到公众号。
在obsidian中,用插件,实现预览和一键发布 ✅
- 在个人网站上内嵌AI,实现智能采编❓
TODO 📌
20240521
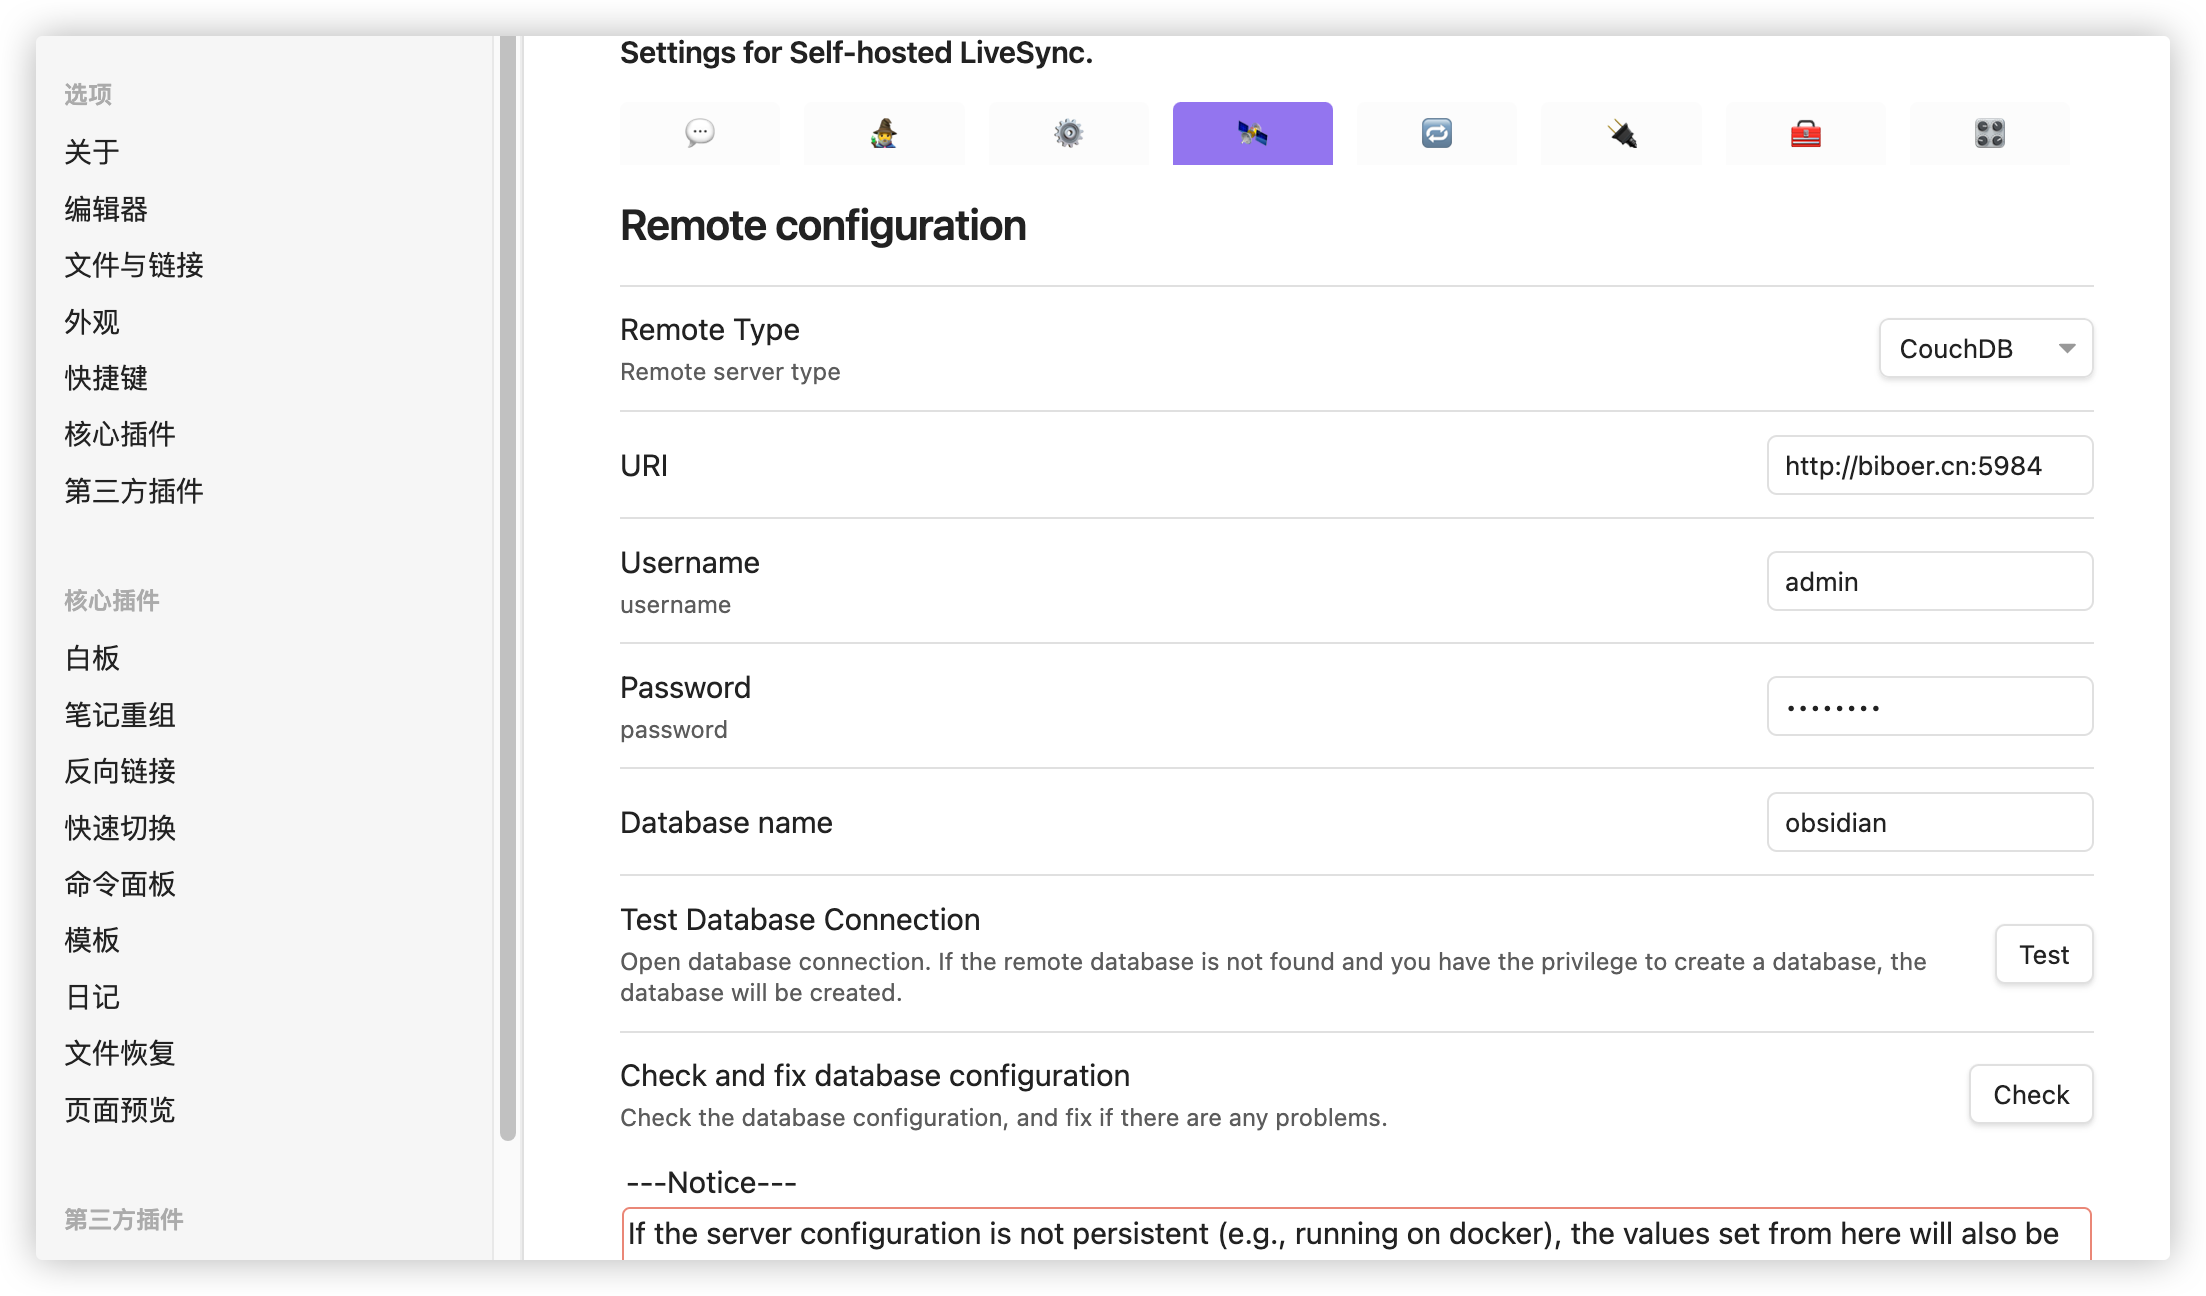
- 用obsidian的livesync插件,把资源同步到云上,在所有终端可以使用obsidian同步编辑和发布。
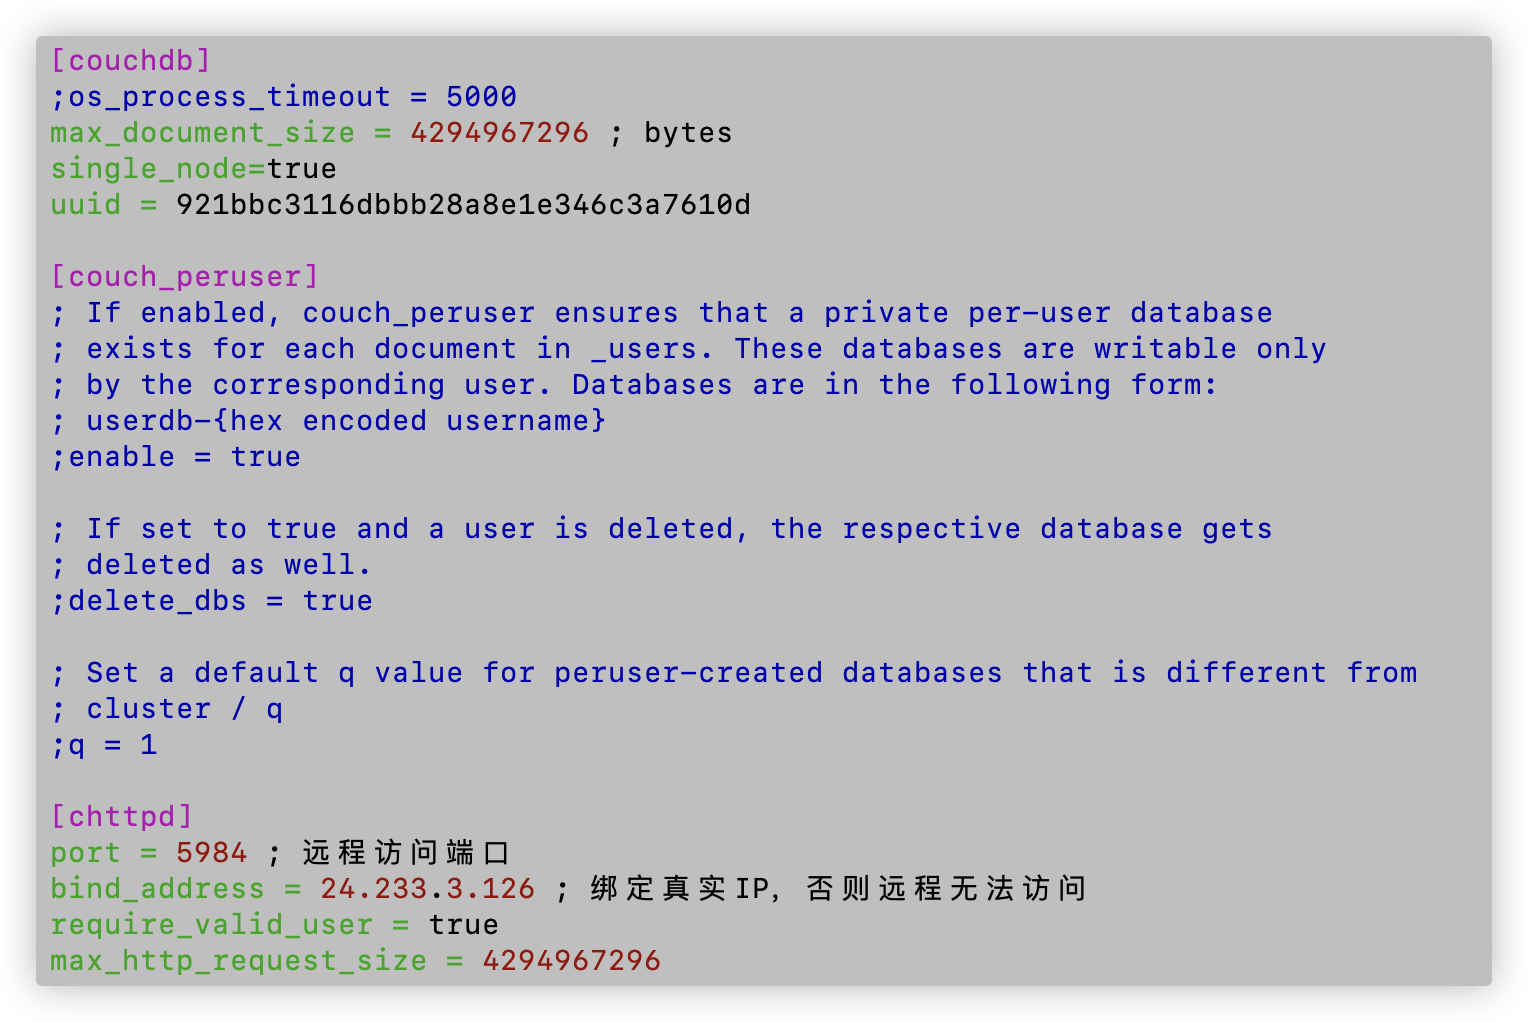
在biboer.cn这台服务器上安装couchdb(LiveSync使用的数据库),
参考这个
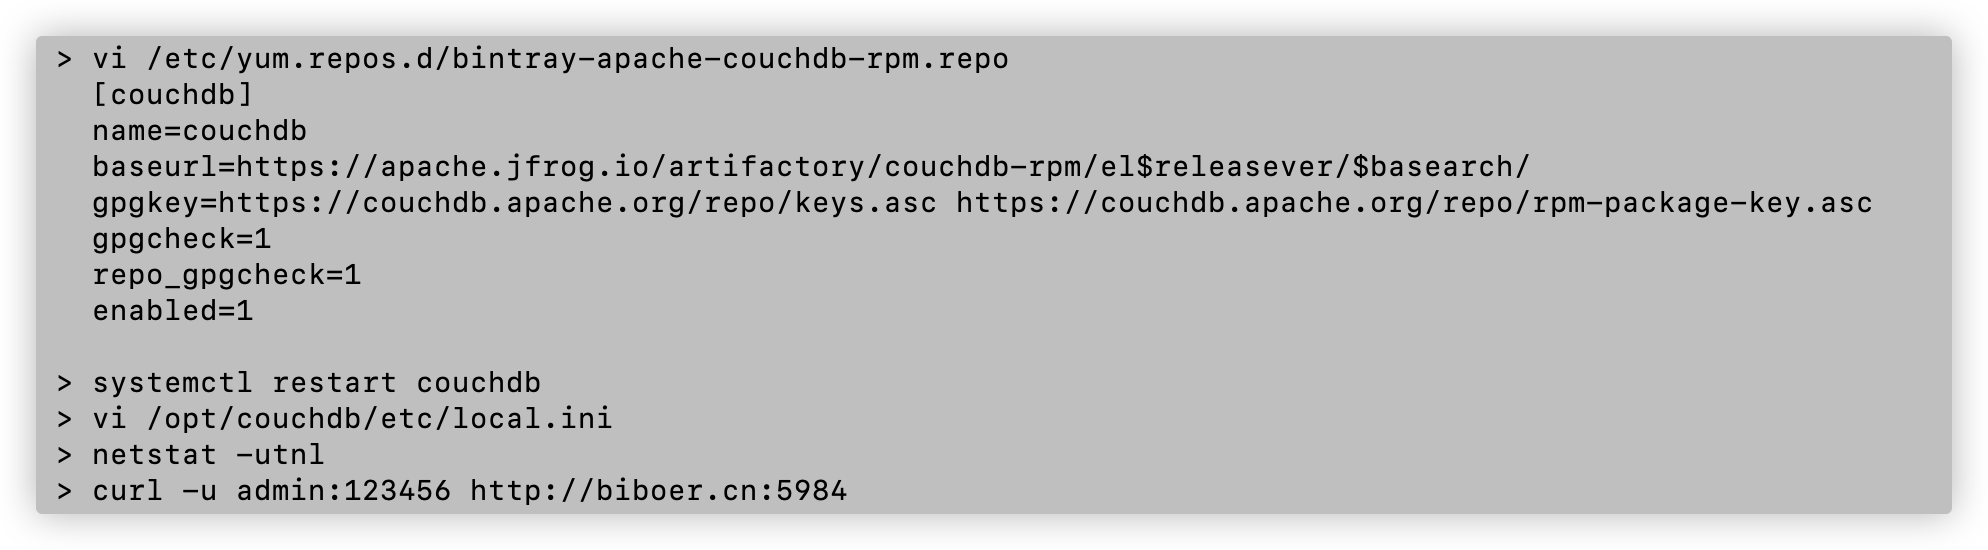 目录:/opt/couchdb
https://biboer.cn:6984
注意:⚠️ http端口是5984,https是6984
目录:/opt/couchdb
https://biboer.cn:6984
注意:⚠️ http端口是5984,https是6984

- 下载配置LiveSync插件
❌ TODO 📌
20240521 ‼️ ✅
hugo server 改 nginx❓(原因是"hugo server"对https证书的支持没有搞定。) ✅
yum nginx
配置注意:
- 权限问题,配置中user nginx 改为 user root;
- site文件指定为: /home/gavin/myweb/public
hugorun.sh注释掉:#echo $pass | sudo -S hugo server --bind 24.233.3.126 -p 80 --baseURL=http://biboer.cn &
hugorun.sh,用普通用户发布到public文件 #echo $pass | sudo -S hugo && npm run algolia 改为 hugo && npm run algolia
20240820 ‼️ ✅
- 购买ssl证书,提供给商家域名,商家提供主机名、记录类型、记录值。
- 配置域名解析,完成后告诉商家。
- 商家提供SSL证书(发送到邮箱)。
- 证书放到web home下:
[gavin@kvm-douboer cert]$ pwd
/home/gavin/myweb/cert
[gavin@kvm-douboer cert]$ ls nginx/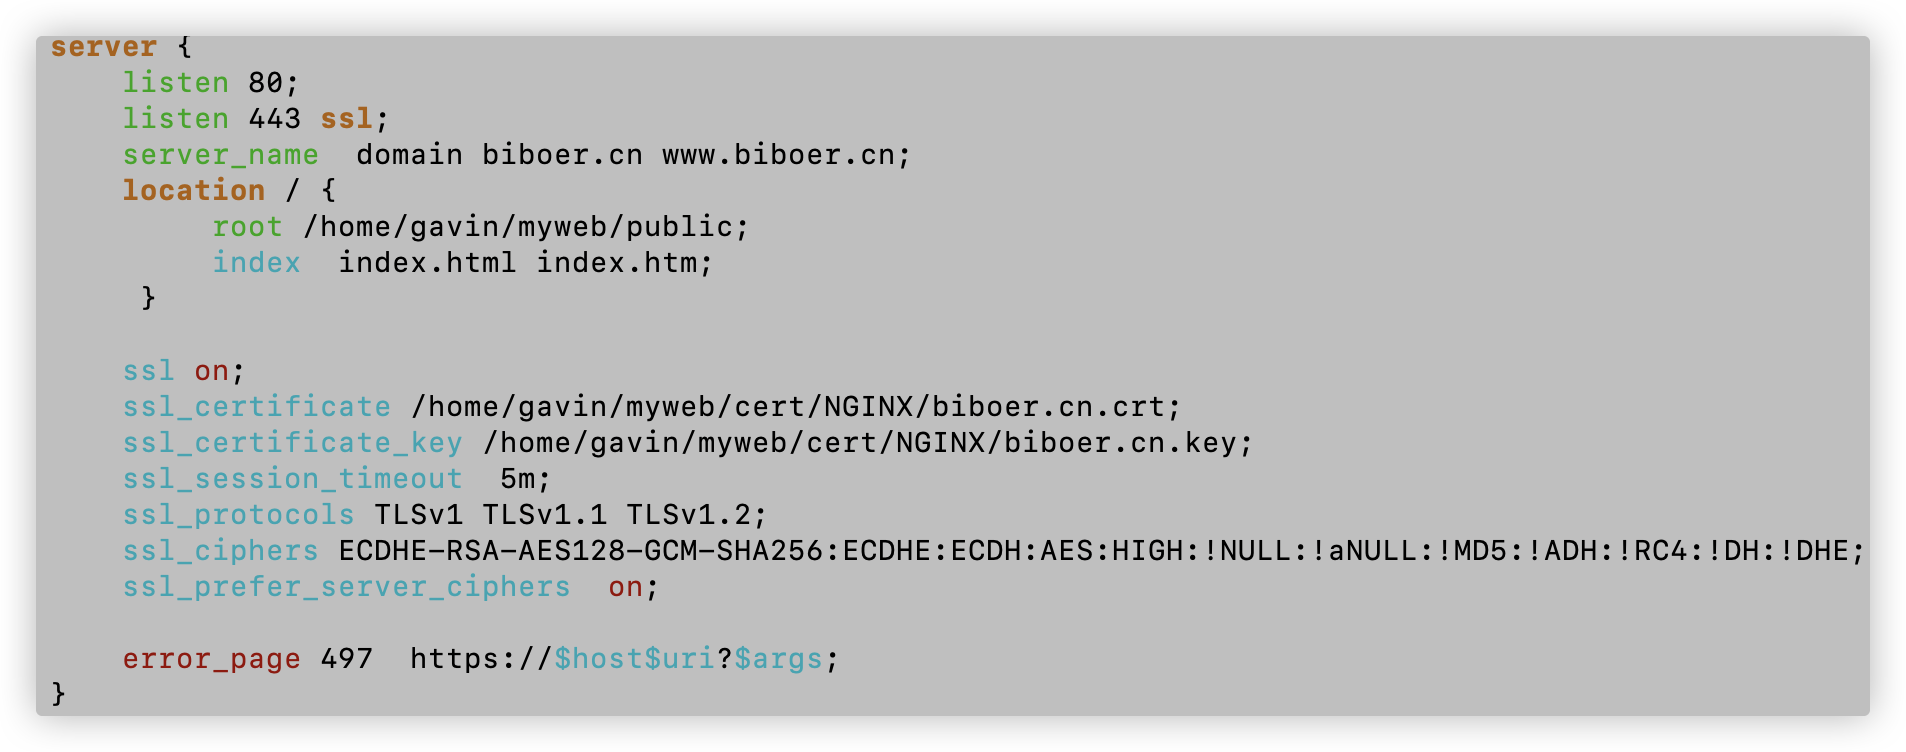
biboer.cn.crt biboer.cn.key- 配置/etc/nginx/nginx.conf
 46 ssl on;
 47 ssl_certificate /home/gavin/myweb/cert/nginx/biboer.cn.crt;
48 ssl_certificate_key /home/gavin/myweb/cert/nginx/biboer.cn.key;- 验证&启动nginx
sudo nginx -t
sudo nginx -s reload
sudo systemctl start nginx
20240911
专门处理markdown的label,让页面更加丰富,输出到public
20241023
重启后如何自动检测并启动相关服务。
- ssh免密登录
- 挂载/data
- 启动nginx
- 启动gitea
check_service.sh ✅
20241115
ssh免密登录。 ✅
问题:
gavin@GavinsMAC myweb % ~/tomyweb.sh
@@@@@@@@@@@@@@@@@@@@@@@@@@@@@@@@@@@@@@@@@@@@@@@@@@@@@@@@@@@
@    WARNING: REMOTE HOST IDENTIFICATION HAS CHANGED!     @
@@@@@@@@@@@@@@@@@@@@@@@@@@@@@@@@@@@@@@@@@@@@@@@@@@@@@@@@@@@
IT IS POSSIBLE THAT SOMEONE IS DOING SOMETHING NASTY!
Someone could be eavesdropping on you right now (man-in-the-middle attack)!
It is also possible that a host key has just been changed.
The fingerprint for the ED25519 key sent by the remote host is
SHA256:+a7CGzybNE9gRxwbGRIOUTOangbC+PXfnL76X0Su1ho.
Please contact your system administrator.
Add correct host key in /Users/gavin/.ssh/known_hosts to get rid of this message.
Offending ECDSA key in /Users/gavin/.ssh/known_hosts:2
Host key for [biboer.cn]:21174 has changed and you have requested strict checking.
Host key verification failed.
SOLVED:
mac本地
rm ~/.ssh/known_hosts远程配置centos,SSH配置:确保远程服务器的 /etc/ssh/sshd_config 文件中,以下配置启用了公钥认证:
PubkeyAuthentication yes
PasswordAuthentication no  # 可选,禁用密码登录

sudo systemctl restart sshd # 配置完成后,重启SSH服务
20250210
在push时在脚本check_services.sh中,自动检查/data是否已挂载、nginx和gitea是否已启动。
✅
20250524
clamav 杀毒。发现手机访问会跳转到非法网站。
使用官方镜像重新启动容器 sudo docker run -d --name clamav
-v /home/gavin/myweb:/data
-v /home/gavin/clamav/logs:/var/log/clamav
-e CLAMAV_NO_FRESHCLAMD=1
clamav/clamav:latest更新病毒库 sudo docker run --rm
-v /home/gavin/clamav-db:/var/lib/clamav
clamav/clamav:latest
freshclam扫描目标目录 sudo docker run --rm
-v /home/gavin/myweb:/scan
-v /home/gavin/clamav-db:/var/lib/clamav
clamav/clamav:latest
clamscan -r -i /scan
51.LA流氓软 🈲 ❌ ❌ ❌ ❌ ❌ ❌
问题:❓
- 搭建Nginx的维护切换点。
- 增加./static/maintenance.html
- 增加./.maintenance作为维护判断标识,文件存在表示维护状态
mv .maintenance .maintenance.bk # 停止维护
mv .maintenance.bk .maintenance # 维护状态- 修改/etc/nginx/nginx.conf文件
     location / {
          # 直接检查维护文件并返回页面
          if (-f /home/gavin/myweb/.maintenance) {
              rewrite ^ /maintenance.html break;
          }

          root /home/gavin/myweb/public;
          index  index.html index.htm;
     }
algoria搜索正常,但点击链接404:https://biboer.cn/search/undefined#undefined 修改了themes/hugo-theme-cleanwhite/layouts/_default/list.algolia.json的原因,用备份恢复后正常。
网址中带中文不利分享。 ‼️ ✅
在所有markdown文章的头部增加:slug: "xxx",其中xxx为markdown文件名的拼音。
AI批量修改。在当前文件夹的所有md文件中插入:"slug: ",如:
---
layout: post
title: 酒后写草
subtitle:
description:
slug: "jiuhouxiecao"
date: 2024-03-14 11:00:00
author: "大童"
image: "/img/zixutie.jpeg"
showtoc: false
tags:
    - 书法
    - 草书
URL: ""
categories: [ 小艺 ]
---
20250530 ❌
需求:hugo发布文章时,转化markdown格式为公众号可以使用的html,提取标题、封面、作者等元素,上传到公众号。 分解:
- markdown转为html
- 素材上传❓
- 文章上传整合❓
改思路: 所有基于markdown,渲染为html使用第三方组件。个人可以加载主题。
20250825 ‼️ ✅
SSL证书到期维护
- 购买证书(淘宝已购买3年,提早一个月跟买家沟通,更换ssl证书)
- 店家发送CNAME解析记录,在http://www.everdns.com/Analysis更新CNAME:
主机记录:_2BC5F38553D19B1A3B2E13D3B3881E09
记录类型:CNAME
记录值:3501D5617606BACEDEBCA66C4F0BBC13.D92A7BF3C4A31E7C5B3BC05AB407C5D6.t0232565001756123865.sectigo.com
- 商家邮件发送密钥文件包biboer-cn-0825202838,替换nginx配置路径中的ssl私钥和公钥: cp biboer-cn-0825202838/nginx/biboer-cn-0825202838_chain.pem /home/gavin/myweb/cert/nginx/biboer.cn.crt cp biboer-cn-0825202838/nginx/biboer-cn-0825202838_key.key /home/gavin/myweb/cert/nginx/biboer.cn.key
/etc/nginx/nginx.conf:
  ssl_certificate /home/gavin/myweb/cert/nginx/biboer.cn.crt;
ssl_certificate_key /home/gavin/myweb/cert/nginx/biboer.cn.key;- 测试并重启nginx:
sudo nginx -t
sudo nginx -s reload
sudo systemctl start nginx- 测试网页访问。另外有个问题,在微信中访问仍然会被拦截,需要发邮件跟微信说明。
20250831
安装Umami,用于访问统计。 ❌
cd /data
git clone https://github.com/mikecao/umami.git
cd umami

npm install --legacy-peer-deps
npm run build

# root默认无密码
mysql -u root -p

CREATE DATABASE umami;
CREATE USER 'umami'@'localhost' IDENTIFIED BY 'gav..VV';
GRANT ALL PRIVILEGES ON umami.* TO 'umami'@'localhost';

[gavin@kvm-douboer ~/myweb]$ cat ~/.tcshrc
setenv DATABASE_URL "mysql://umami:mypassword@localhost:3306/umami"
[gavin@kvm-douboer ~/myweb]$ source ~/.tcshrc
[gavin@kvm-douboer umami]$ npm start
> umami@2.19.0 start
> next start
⨯ Failed to start server
Error: listen EADDRINUSE: address already in use :::3000
at <unknown> (Error: listen EADDRINUSE: address already in use :::3000)
at new Promise (<anonymous>) {
code: 'EADDRINUSE',
errno: -98,
syscall: 'listen',
address: '::',
port: 3000
}
[gavin@kvm-douboer umami]$ node -e "console.log(require('bcryptjs').hashSync('gavin123', 10))"
$2a$10$pu4oJ.fqpn5PPZoktCOZ0ul6o3x8U1L8oG4TcUNlDG2KBBYc/B4LW
[gavin@kvm-douboer umami]$ mysql -u umami -p'gav...VV' -h localhost umami
INSERT INTO `user` (user_id, username, password, role, created_at, display_name) VALUES (UUID(), 'douboer', '$2a$10$pu4oJ.fqpn5PPZoktCOZ0ul6o3x8U1L8oG4TcUNlDG2KBBYc/B4LW', 'admin', NOW(), 'Admin');
#更新密码
UPDATE `user` SET password = '$2b$10$abcdefghijk...' WHERE username = 'douboer';
#启动
npx cross-env PORT=4000 npm start
#或修改/data/umami/.next/standalone/server.js
#const currentPort = parseInt(process.env.PORT, 10) 4000
#启动
node .next/standalone/server.js登陆网站,域名biboer.cn加入统计。
[gavin@kvm-douboer umami]$ ps aux | grep umami
gavin     314100  0.7  0.2 409372 46840 pts/0    Sl   20:03   0:00 node /data/umami/node_modules/.bin/cross-env PORT=4000 npm start
#加入systemctl, /etc/systemd/system/umami.service:
[Unit]
Description=Umami Analytics
After=network.target

[Service]
Type=simple
User=gavin
WorkingDirectory=/data/umami
ExecStart=/usr/bin/node /data/umami/.next/standalone/server.js
Restart=always
Environment=PORT=4000
Environment=DATABASE_URL=mysql://umami:mypassword@localhost:3306/umami

[Install]
WantedBy=multi-user.target
sudo systemctl daemon-reload
sudo systemctl enable umami
sudo systemctl restart umami
sudo journalctl -u umami -f目前统计不生效。 使用goaccess轻量工具替代。 ✅
20250917
gavin@GavinsMAC devops % git push -u origin main
**error**: RPC failed; HTTP 413 curl 22 The requested URL returned error: 413
send-pack: unexpected disconnect while reading sideband packet
fatal: the remote end hung up unexpectedly
改为:
gavin@GavinsMAC devops % git remote set-url origin ssh://git@biboer.cn:21174/gavin/devops.gitgit@biboer.cn : Permission denied (publickey,gssapi-keyex,gssapi-with-mic). fatal: Could not read from remote repository.
Solve: gitea主页设置中“ssh密钥”设置中增加公钥。
/Users/gavin/.ssh
gavin@GavinsMAC .ssh % cat id_rsa.pub
ssh-ed25519 AAAAC3NzaC1lZDI1NTE5AAAAIJm6EFxutYb1Xm8Ijo6azFciGjUuiuFi9EHxpecGDbyW gavin@GavinsMAC.local
测试:
gavin@GavinsMAC .ssh % ssh -i ~/.ssh/id_rsa -T git@biboer.cn -p 21174
Hi there, gavin! You've **successfully authenticated with the key named key1**, but Gitea does not provide shell access.
20251011
安装goaccess访问统计工具 ✅
sudo yum install goaccess
sudo vi /etc/systemd/system/goaccess.service
[Unit]
Description=GoAccess Real-Time Log Analyzer
After=network.target nginx.service
[Service]
User=root
ExecStart=/usr/bin/goaccess /var/log/nginx/access.log \
--log-format=COMBINED \
-o /home/gavin/myweb/public/report.html \
--real-time-html
Restart=always
[Install]
WantedBy=multi-user.targetsudo systemctl daemon-reload
sudo systemctl enable goaccess
sudo systemctl start goaccess访问:https://biboer.cn/report.html
samba/smb 共享
sudo yum install samba
sudo useradd samba
sudo vi /etc/samba/smb.conf
39 [rootdir] #自定义的共享文件夹
40 comment = SambaRoot
41 path = /home/samba/
42 read only = No// 添加 Samba 用户帐号
sudo smbpasswd -a gavin
sudo systemctl start smb未调通 ❌
Q & A
git server上以明文形式保存目录吗? A: 加密
ssh免密登录,无效❓
- 本地mac操作:
ssh-keygen
ssh-copy-id -i ~/.ssh/id_rsa.pub -p 21174 gavin@biboer.cn- 远程配置centos: SSH配置:确保远程服务器的 /etc/ssh/sshd_config 文件中,以下配置启用了公钥认证:
PubkeyAuthentication yes
PasswordAuthentication no  # 可选,禁用密码登录

sudo systemctl restart sshd # 配置完成后,重启SSH服务
hugo命令发布到public以后,部署❓ A: nginx
远程拉取文件,scp出错❓ scp gavin@biboer.cn :/tmp/config* .
A: 通配符问题,在zshrc中加配置。
echo "setopt nonomatch" >> ~/.zshrc
source ~/.zshrc- git submodule add https://github.com/TransparentLC/hexo-theme-akarin.git themes/hexo-theme-akarin 出错:'themes/hexo-theme-akarin' already exists in the index A:
git rm -r --cached themes/hexo-theme-akarin- [gavin@kvm-douboer ~/myweb]$ sudo npm run algolia
> myweb@1.0.0 algolia /home/gavin/myweb
> atomic-algolia
(node:62111) UnhandledPromiseRejectionWarning: AlgoliaSearchNetworkError: connect ECONNREFUSED 127.0.0.1:443
at ClientRequest.error (/home/gavin/myweb/node_modules/algoliasearch/src/server/builds/node.js:233:14)
at Object.onceWrapper (events.js:286:20)
at ClientRequest.emit (events.js:198:13)
at TLSSocket.socketErrorListener (_http_client.js:401:9)
at TLSSocket.emit (events.js:198:13)
at emitErrorNT (internal/streams/destroy.js:91:8)
at emitErrorAndCloseNT (internal/streams/destroy.js:59:3)
at process._tickCallback (internal/process/next_tick.js:63:19)
(node:62111) UnhandledPromiseRejectionWarning: Unhandled promise rejection. This error originated either by throwing inside of an async function without a catch block, or by rejecting a promise which was not handled with .catch(). (rejection id: 2)
(node:62111) [DEP0018] DeprecationWarning: Unhandled promise rejections are deprecated. In the future, promise rejections that are not handled will terminate the Node.js process with a non-zero exit code.
[gavin@kvm-douboer ~/myweb]$ sudo npm run algolia
❗️Solve:
> cat .env
ALGOLIA_APP_ID = 67T0HBIEFP
ALGOLIA_ADMIN_KEY = e712ba7148f242911a6f33da81e02a7f
ALGOLIA_INDEX_NAME = gavin
ALGOLIA_INDEX_FILE = public/algolia.json评论系统
- Hugo 的 LoveIt 主题添加 Giscus 评论 注意:config.toml配置格式,下划线
- https://giscus.app/zh-CN
- disqus https://disqus.com/home/settings/account/
- 私有化部署twikoo ✅
- 查找docker包 [gavin@kvm-douboer ~]$ docker search twikoo
Emulate Docker CLI using podman. Create /etc/containers/nodocker to quiet msg.
INDEX       NAME                              DESCRIPTION             STARS       OFFICIAL    AUTOMATED
docker.io   docker.io/imaegoo/twikoo          Twikoo 私有部署 Docker 镜像。  6
docker.io   docker.io/llnancy/twikoo                                  0
docker.io   docker.io/lzc256/twikoo                                   0
docker.io   docker.io/colsrch/twikoo                                  0
docker.io docker.io/dijkeuorg/twikoo-arm64 0- 拉到本地
sudo docker pull docker.io/imaegoo/twikoo- 启动服务
docker run -d -p 8081:8080 twikoo
#docker run -p 8081:8080 -v ${PWD}/twikoo:/app/data -d docker.io/imaegoo/twikoo
如端口被占用,可用如下命令查看占用端口,和PID,如应用不需要,可kill该PID
netstat -lnpt- 浏览器输入:http://biboer.cn:8081,返回
{"code":100,"message":"Twikoo 浜戝嚱鏁拌繍琛屾甯革紝璇峰弬鑰� https://twikoo.js.org/frontend.html 瀹屾垚鍓嶇鐨勯厤缃�","version":"1.6.31"}biboer.cn服务器,sudo vi /etc/nginx/nginx.conf location /twikoo/ { proxy_pass http://127.0.0.1:8081/; }
在config.toml中增加:
twikoo_env_id = "https://biboer.cn/twikoo/"完成以上后,可以评论。但上传图片显示:"上传失败:未配置图片上传服务"❓
代码块渲染修改❓ ✅
宝塔面板安装 ❌ https://www.bt.cn/new/download.html
20240521 ‼️。✅
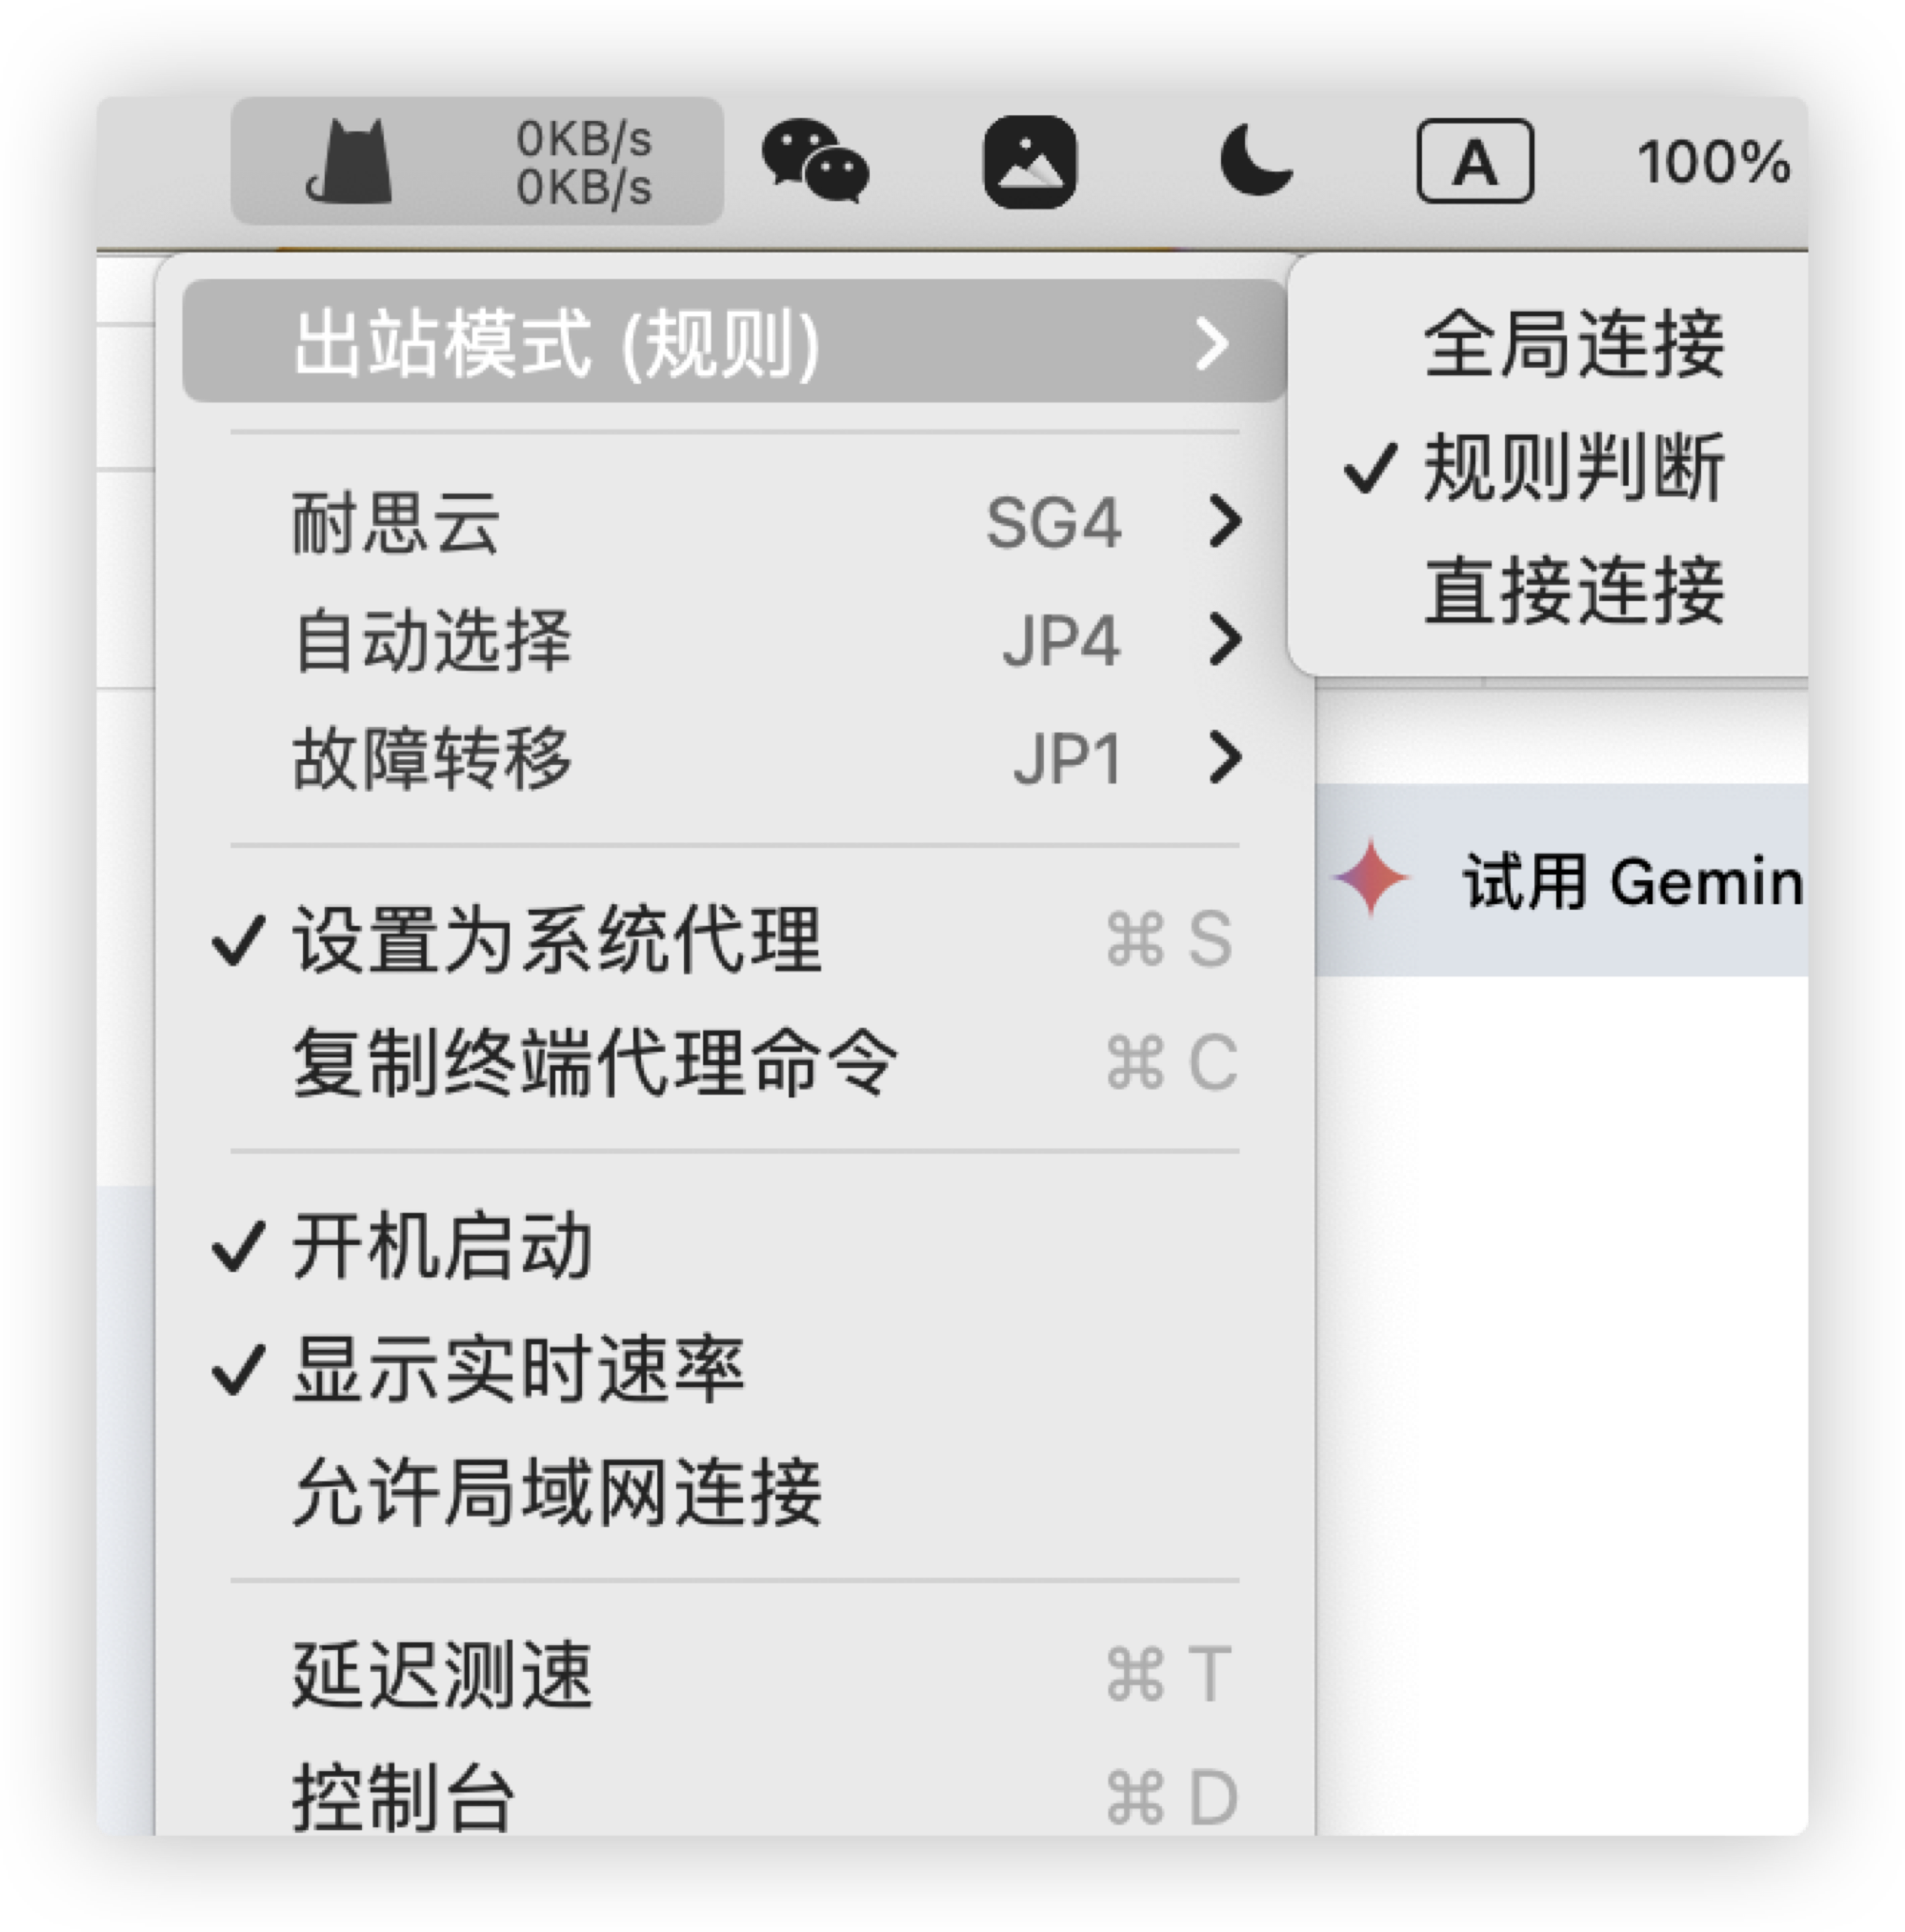
很久的问题❗️clash代理下,访问biboer速度慢的问题。
使用clash代理,在“规则判断”下模式下,在rules中增加: - 'DOMAIN-KEYWORD,biboer,DIRECT'
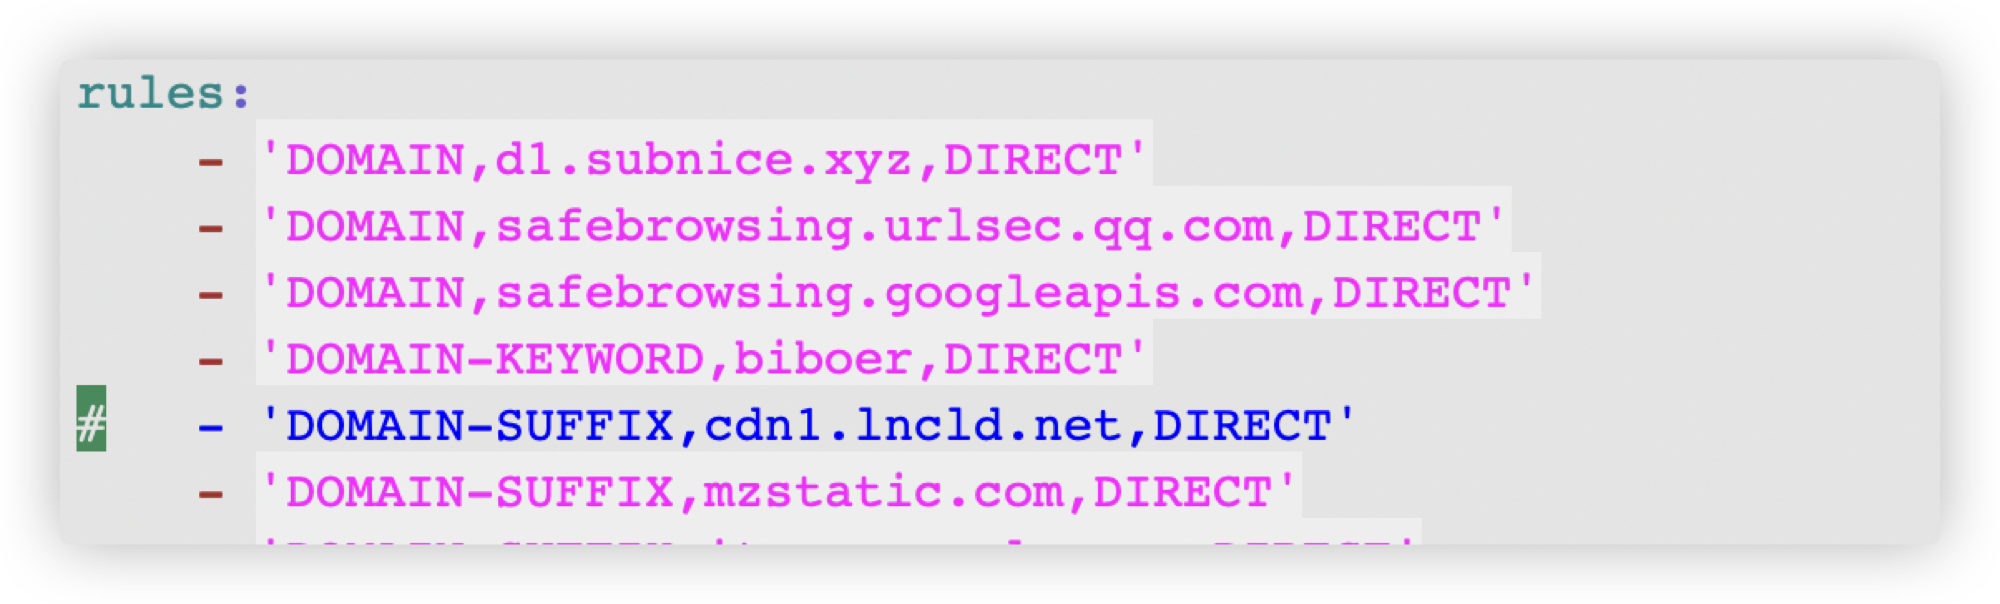
但访问biboer.cn加载极慢❓
 跟踪网页耗时,加载时在cdn1.lncld.net访问时阻塞时间长。hugo使用位置:
themes/hugo-theme-cleanwhite/layouts/partials/page_view_counter.html:
<script src="https://cdn1.lncld.net/static/js/av-core-mini-0.6.1.js"></script>

themes/hugo-theme-cleanwhite/layouts/_default/single.html:
{{ partial "page_view_counter.html" . }}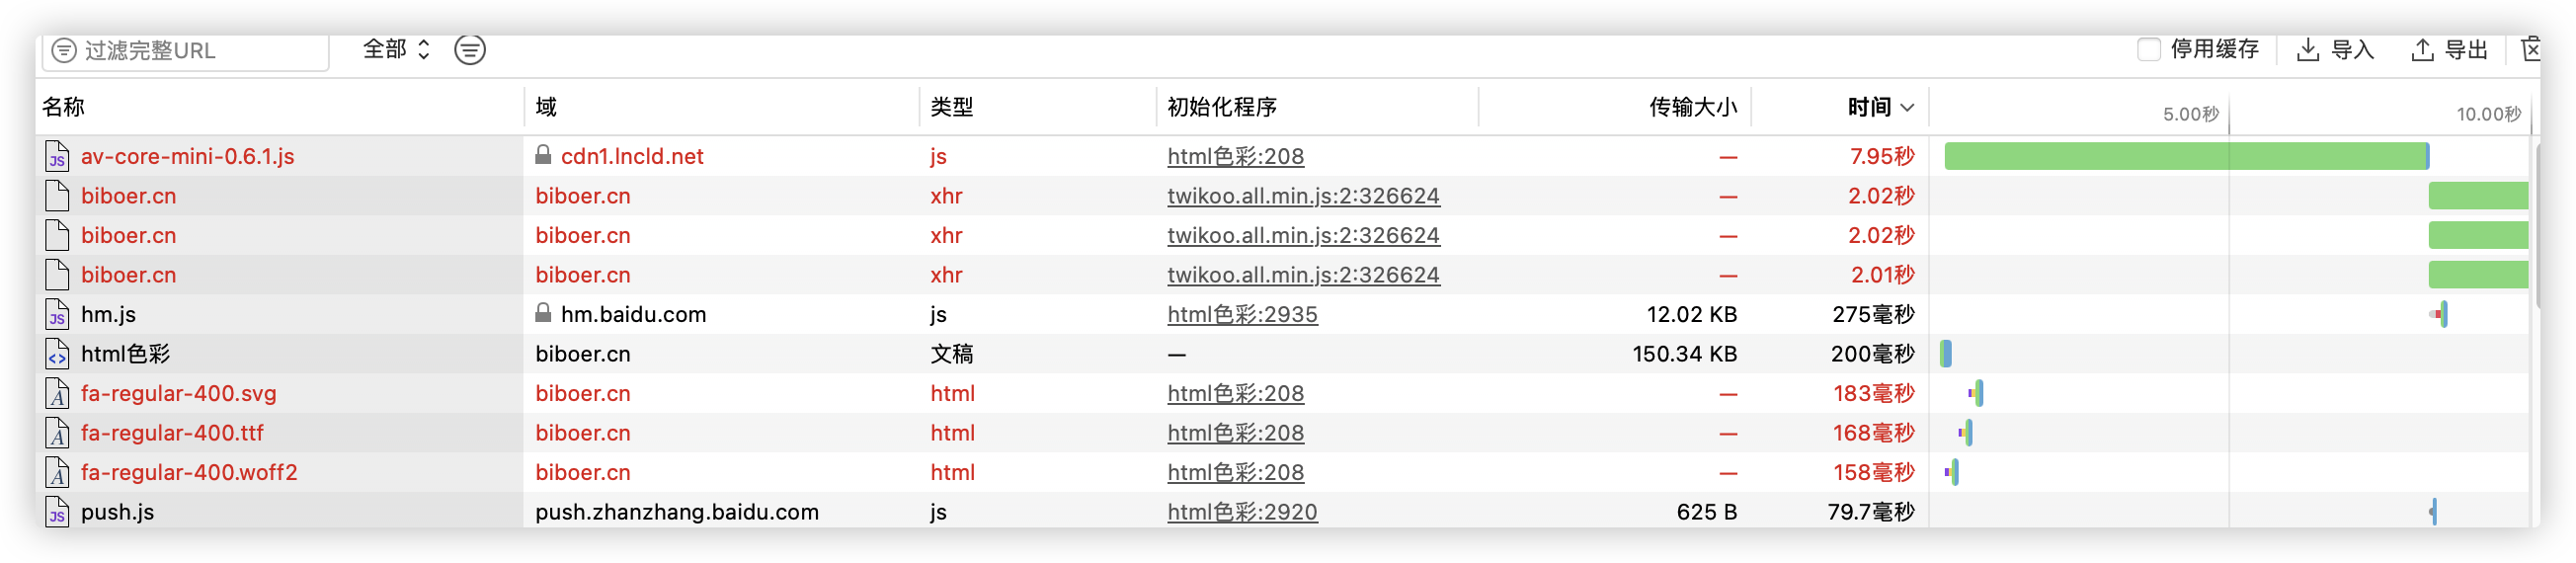
在配置文件中增加:
- 'DOMAIN-SUFFIX,cdn1.lncld.net,DIRECT'
20240526
gitea容量超限,大于1GB,无法上传❓在biboer.cn上搭建git server 搭建gitea。
#/etc/nginx/nginx.conf
          location /twikoo/ {
              proxy_pass http://127.0.0.1:8081/;
          }

          location /gitea/ {
              proxy_pass http://127.0.0.1:3000/;
              proxy_set_header Host $host;
              proxy_set_header X-Real-IP $remote_addr;
              proxy_set_header X-Forwarded-For $proxy_add_x_forwarded_for;
              proxy_set_header X-Forwarded-Proto $scheme;
          }

#/data/gitea/custom/conf
[server]
ROOT_URL = https://biboer.cn/gitea/ # 改成子路径 + HTTPShttp://biboer.cn:3000/gavin/mywed20240718
su git
[git@kvm-douboer myweb]$ /data/gitea/gitea  admin user list
ID   Username Email              IsActive IsAdmin 2FA
1    gavin    douboer@icloud.com true     true    false
20240705
挂载新盘/挂载/data:
sudo fdisk -l
sudo mount /dev/vdb /data
cd /data/
启动gitea:
sudo systemctl enable gitea #激活gitea 并将它作为系统自启动服务
sudo systemctl start gitea  # 启动gitea
信息
https://www.5678yun.com/user/domain/ 域名:biboer.cn
http://www.idc35.com/user/register2.asp IP:24.233.3.126 端口:21174
scp -P 21174 id_rsa.pub gavin@24.233.3.126端口已修改为22
其他
- 开源图床
- 开源文件上传服务
my web中管理图片,不需要三方图片拖管。
废弃 ❌
参考网站
- hugo模版。部署过程中,做了修改。
- risehere